2026 cost snapshot
| Item | Planning range / amount | Basis |
|---|---|---|
| National encapsulation range | $3,000–$15,000 | HomeGuide 2026 |
| National cost per sq. ft. | $3–$10 | HomeGuide 2026 |
| Angi typical professional range | $5,000–$15,000 | Angi 2026 |
| Angi average | About $5,500 | Angi 2026 |
| Vapor barrier installation | $1,200–$4,000 | HomeGuide 2026 |
| Dehumidifier installed | About $1,000–$3,000+ | HomeGuide planning range |
Quick answer
Nashville homeowners should plan roughly $3 to $10 per square foot for crawl space encapsulation, with many full projects landing between $3,000 and $15,000. Angi’s 2026 national benchmark places professional encapsulation commonly around $5,000 to $15,000, averaging about $5,500. Nashville-specific bids can move higher when the crawl space needs drainage, mold remediation, wood repair, insulation removal, electrical work for a dehumidifier, or difficult low-clearance labor.
The local reason to take moisture seriously is Nashville’s humid, rain-prone climate and large seasonal swings. The National Weather Service climate record shows substantial year-round precipitation and warm summers. A vented crawl space can take on moisture from outdoor air, groundwater, surface drainage, plumbing leaks, or foundation seepage. Encapsulation works best when the water source is diagnosed first instead of simply covering damp soil with plastic.
What a real encapsulation includes
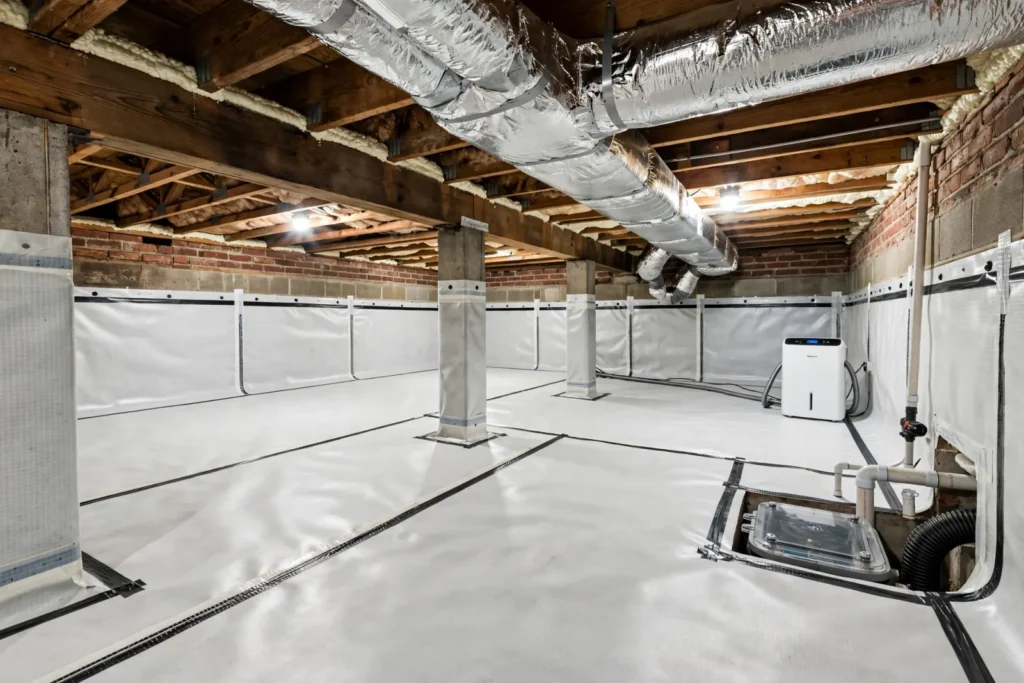
A proper encapsulation is more than a thin ground sheet. The scope usually includes cleaning, sealing ground and wall vapor pathways, treating columns and penetrations carefully, sealing or managing vents, addressing drainage, and controlling humidity after the space is closed. Many systems also include a dedicated crawl-space dehumidifier and sealed access door.
Before new materials go in, damaged insulation, organic debris, standing water, active leaks, pest contamination, or significant mold may need to be removed. If a contractor proposes to hide wet wood or active fungal growth behind a new liner, stop and ask for a moisture and repair plan.
Nashville moisture sources
Surface water is one of the first items to check. Downspouts that terminate at the foundation, negative grading, blocked drainage paths, irrigation, or low areas beside the house can drive water toward the crawl space. Encapsulation cannot compensate for a yard that continuously funnels stormwater against the foundation.
Plumbing leaks are another common hidden source. A slow drain, supply-line leak, or condensate discharge can keep one area wet for months. Correct the leak before closing the space.
Warm humid outdoor air can also condense on cooler framing, ducts, or pipes. This is why a sealed system needs a humidity-control strategy rather than a ‘close every vent and hope’ approach.
Vapor barrier thickness and detailing
Material thickness affects durability, but installation detail matters just as much. A thicker reinforced liner can better resist punctures in service areas, but seams, piers, wall attachment, and penetrations must also be sealed. Ask the contractor to specify the liner thickness, reinforcement, seam method, wall height, termination detail, and warranty.
HomeGuide’s 2026 data places vapor-barrier installation around $1,200 to $4,000. That is only one component of a full encapsulation. Drainage, cleaning, insulation, dehumidification, and structural repair can easily exceed the liner cost.
Drainage before encapsulation
If the crawl space receives liquid water, ask where that water will go after the liner is installed. Interior perimeter drainage, a sump pump, exterior grading, downspout extensions, or a French drain may be part of the solution depending on the source.
A contractor should not sell a sump pump for every damp crawl space, and should not avoid one when groundwater or recurrent seepage clearly requires active drainage. The correct design starts with identifying the water path.
Mold, wood rot and structural repairs
Mold remediation can add hundreds or thousands of dollars depending on area, material and containment. Wood decay is more serious because joists, beams, sill plates, subfloor, or piers may need repair before the crawl space is sealed.
If visible mold is part of the project, use the Home Cost Desk Mold Remediation Cost 2026 guide to separate cleaning/remediation from the encapsulation contract. If floors are sagging or beams are damaged, a foundation or structural contractor may need to define the repair scope first.
Insulation choices
Older crawl spaces often contain falling or moisture-damaged fiberglass between floor joists. An encapsulation project may remove that material and shift the thermal boundary to insulated foundation walls, or may retain a different insulation strategy depending on local code and design.
Do not automatically add spray foam because it is marketed as premium. Closed-cell foam can be useful in specific wall or rim-joist locations, but it can also hide future inspection areas or complicate termite inspection if applied indiscriminately. Ask how the insulation approach coordinates with pest inspection, code, combustion appliances, and future access.
Dehumidifiers and electrical work
A sealed crawl space often uses a dedicated dehumidifier to maintain target humidity. The unit should be sized for the crawl space and moisture load, have a reliable condensate path, and remain accessible for filter and service work.
If a new electrical receptacle or circuit is required, that work should be performed under the appropriate electrical rules. Budget the electrical scope separately instead of accepting an extension cord as a permanent solution.
Nashville permit considerations
Metro Nashville’s Codes and Building Safety Department requires permits for defined residential construction and repair work, while trade work can trigger electrical, plumbing, gas, or mechanical requirements. A simple ground vapor barrier may not be treated the same as structural beam replacement, a new drainage discharge, or new electrical work.
Ask the contractor to list which portions of the encapsulation require permits or inspections for your exact address and scope. If structural repairs are included, the permit question becomes more important. Do not accept a blanket ‘crawl spaces never need permits’ statement.
Worked example: 1,200-square-foot crawl space
For a measured 1,200-square-foot crawl space, multiplying the published national $3–$10-per-square-foot range gives a rough $3,600–$12,000 planning calculation. This is not a Nashville bid survey or a guaranteed all-in quote. The published range spans different project conditions, and drainage, mold remediation, structural repair or electrical upgrades can change the scope substantially.
| Quote line | What to verify |
|---|---|
| Water source and drainage | Diagnosis, discharge location, sump or exterior work if necessary |
| Liner and air sealing | Thickness, wall/pier coverage, seams, access door and penetrations |
| Humidity control | Dehumidifier model, power, condensate disposal and servicing access |
| Excluded repairs | Mold, rotted framing, old insulation, plumbing and permit-related work |
For example, a lower-priced liner-only proposal may leave the homeowner paying separately for drainage and a dehumidifier. Compare the same defined scope and ask for written exclusions before choosing the lowest total.
Three Nashville scenarios
Scenario 1 — dry structure, humid air: the framing is sound and there is no standing water, but the space is musty and the old ground cover is poor. Cleaning, a durable liner, air sealing, vent management, and a dehumidifier may keep the project near the middle of the national range.
Scenario 2 — recurring water after storms: the crawl space takes on water at one side of the house. The project needs exterior grading or drainage plus interior water management before the liner is installed. The price rises because the root cause is larger than humidity.
Scenario 3 — mold and damaged framing: long-term moisture has affected insulation and wood. The project may involve remediation, carpentry, drainage, encapsulation, and dehumidification. A five-figure total can be reasonable when several trades are involved.
How to compare Nashville quotes
Ask every contractor to define the same boundary: cleaning, debris removal, old-insulation removal, drainage, pump, liner thickness, wall coverage, pier wrapping, seam method, vent sealing, access-door work, dehumidifier, electrical work, mold treatment, insulation, structural repairs, and warranty.
Compare scope before price. A liner-only proposal is not equivalent to a proposal that includes drainage, dehumidification, insulation removal, and wood repair. Request a separate price for each of those items, along with the liner thickness, wall and pier coverage, seam treatment, condensate route, warranty exclusions, and responsibility for any permits or inspections.
- Require moisture readings and photographs before work.
- Ask where liquid water will go after the space is sealed.
- Confirm target relative humidity and how it will be monitored.
- Separate mold remediation from simple stain treatment.
- Verify termite-inspection access with the chosen wall/foam detail.
- Keep final photos, warranty documents, equipment model numbers and maintenance instructions.
Step-by-step: compare proposals before signing
- Establish the cause. Ask for dated photographs, crawl-space measurements, moisture readings where relevant, and a written explanation of whether water comes from rain runoff, plumbing, groundwater or humid air.
- Normalize the scope. Have each bidder identify what is included and excluded: drainage, debris and insulation removal, liner thickness, seams, walls, piers, vent and access-door sealing, dehumidifier, electrical work, remediation and structural repairs.
- Check safety and permissions. Identify fuel-burning appliances, preserve termite-inspection access, and confirm permit responsibility for any structural or electrical work with the relevant authority.
- Agree on the work sequence. Correct active leaks, water entry and unsafe conditions before hiding areas behind the new liner; document repairs before they are covered.
- Inspect the finished work. Request photographs of sealed penetrations, accessible equipment, condensate and pump discharge paths, applicable inspection records, warranties and maintenance instructions.
- Schedule follow-up. Record post-work humidity observations and recheck after significant storms. If water returns, investigate its source rather than treating the liner as waterproofing.
How to read moisture measurements
A useful crawl-space proposal should distinguish relative humidity in the air from moisture content in wood. High air humidity can fluctuate quickly, while elevated wood moisture can indicate longer-term risk. Ask the contractor where measurements were taken and whether readings were repeated after rain or seasonal changes.
After encapsulation, keep a simple humidity monitor in the space. A sealed crawl space should not depend on guesswork. If humidity climbs unexpectedly, the cause may be a failed dehumidifier, a new plumbing leak, open access door, drainage problem or air leakage. Monitoring turns a hidden space into a maintainable building system.
Combustion appliances in or near the crawl space
If a furnace, water heater or other fuel-burning appliance uses crawl-space air, sealing the space can change combustion-air conditions. This is one reason encapsulation should not be treated as a cosmetic liner job. The contractor must identify fuel-burning equipment and coordinate with an HVAC or plumbing professional when combustion air or venting could be affected.
Do not approve a plan that simply seals vents around an atmospheric-combustion appliance without addressing its air requirements. Safety comes before energy savings.
Termite inspection and wall coverage
Tennessee homes can require ongoing termite inspection, and some pest professionals need visible access to the top of the foundation wall or other inspection zones. An encapsulation system that covers every surface with opaque foam or liner can make future inspection difficult.
Ask the encapsulation contractor and pest-control provider how the wall detail will preserve inspection access. This is particularly important when spray foam is proposed on masonry or rim areas. A moisture solution should not create a pest-inspection blind spot.
Maintenance after the project
Encapsulation is not maintenance-free. Check the liner for punctures after plumbing, cable or HVAC service; clean dehumidifier filters; verify the condensate drain; inspect the sump if present; and look for new leaks after major storms. Keep storage off critical drainage paths and do not allow future contractors to cut the liner without resealing it.
A yearly crawl-space check is inexpensive compared with repairing hidden wood damage. Keep baseline photographs from completion so later changes are easy to spot.
When encapsulation is not the first project
Do not start with encapsulation when the crawl space has active sewage leakage, major structural settlement, uncontrolled flooding, severe pest infestation or unsafe electrical conditions. Those problems require their own repair first. Encapsulation can then protect the corrected space.
The same principle applies outside the crawl space. If downspouts dump beside the foundation or the yard slopes toward the house, correct those conditions before relying on an interior liner and pump to manage every storm.
Radon, soil gas and liner sealing
A ground liner can reduce some soil-vapor movement, but crawl space encapsulation is not automatically a radon mitigation system. Radon risk varies by location and house, and the only way to know the indoor level is to test. If a Nashville-area home has an elevated radon result, discuss the planned crawl-space liner with a qualified radon professional before the work is completed.
A radon mitigation design may use sub-membrane depressurization beneath the crawl-space liner. In that case, seam quality, wall attachment, and penetrations become part of the pressure boundary. It is much easier to coordinate suction piping and test ports before the final liner is finished than to cut into a new system later.
Use the Home Cost Desk Radon Mitigation Cost 2026 guide for the separate radon scope. Do not let an encapsulation contractor promise radon reduction without post-work testing.
Sump pumps, backup power and the limits of encapsulation
When groundwater or recurrent seepage requires a sump pump, the project should include a reliable discharge path and maintenance plan. The pump basin should be accessible, the cover should fit the encapsulation detail, and the discharge should move water away from the foundation without creating an erosion or freezing problem.
Power outages matter because heavy storms can occur at the same time utility power fails. A battery backup or secondary pump can be appropriate for homes where pump failure would quickly flood the crawl space. The right level of redundancy depends on how much water enters and how much damage a failure would cause.
Encapsulation does not make a crawl space waterproof against unlimited floodwater. If the property is flood-prone or receives large volumes of surface runoff, exterior grading, drainage, and broader site planning remain essential.
Conditioned crawl spaces, HVAC and resale records
Some encapsulated crawl spaces are intentionally conditioned or receive a small amount of supply air under an approved design. Others rely on dehumidification without direct HVAC supply. The correct approach depends on local code, combustion equipment, duct configuration, and the overall building design.
If the home has leaky supply ducts in the crawl space, repair them as part of the project. A sealed crawl space should not be used as an excuse to ignore disconnected ducts or uninsulated metal surfaces that sweat during summer operation.
Keep before-and-after photographs, moisture readings, liner specifications, dehumidifier model information, drainage details, structural repair invoices, permits, and warranties. These records help a future buyer distinguish a professionally corrected moisture issue from a cosmetic cover-up and make warranty service easier.
For the national cost baseline before Nashville-specific conditions, see our national crawl space encapsulation cost guide.
Bottom line
Nashville crawl space encapsulation in 2026 often fits within the national $3,000 to $15,000 range, with $3 to $10 per square foot a useful starting point. The final price depends less on the city name than on how much water, mold, damaged material, drainage, insulation, and mechanical humidity control the space actually needs.
The best project is not the thickest liner. It is a complete moisture-control system that fixes bulk water first, seals vapor pathways, protects structural wood, controls humidity, and remains serviceable for future inspections.
Frequently asked questions
How much does crawl space encapsulation cost in Nashville?
A useful planning range is about $3,000 to $15,000, or roughly $3 to $10 per square foot. Water management, mold, insulation removal, structural repair and dehumidification can push the total higher.
Does every Nashville crawl space need a dehumidifier?
Not automatically, but many sealed crawl spaces benefit from active humidity control. The contractor should explain the target humidity and how the space will stay dry during humid weather.
Should drainage be installed before the vapor barrier?
If liquid water enters the crawl space, yes—the water source should be corrected or managed first. A liner is not a substitute for grading, drainage or leak repair.
Can encapsulation fix sagging floors?
No. Sagging floors may indicate damaged joists, beams, supports or foundation movement. Structural problems should be evaluated and repaired separately.
Does crawl space encapsulation need a permit in Nashville?
Permit requirements depend on scope. Structural, electrical, plumbing or drainage work may trigger permits or inspections even if a simple liner installation does not. Verify with Metro Nashville for the exact project.
What should a Nashville encapsulation warranty cover?
Ask whether it covers liner attachment, seam failure, humidity performance, dehumidifier equipment, water entry, drainage components and service visits. Many warranties exclude pre-existing structural or plumbing issues.
How can I tell whether encapsulation actually solved the moisture problem?
Keep the contractor’s baseline photographs and moisture observations, then compare them with post-work readings. Look for dry surfaces after storms, intact seams, no new plumbing leaks, and a working dehumidifier or other documented humidity-control method. A dry-looking liner on installation day is not proof that the underlying water source was corrected.
Is a thicker liner always the best upgrade?
Not necessarily. A durable liner is valuable where service traffic could puncture it, but poor seam sealing, uncovered piers, an unsealed access door or unresolved stormwater entry can undermine even a thick product. Ask for the complete installation specification rather than choosing by thickness alone.